Getting Started
If you're already familiar with Django, expand the Quick Start below and skip the rest.
Quick Start
1. Install
pip install pinmok
2. settings.py — add to the very top of INSTALLED_APPS
INSTALLED_APPS = [
    'pinmok.padmin',  # must come before django.contrib.admin
    'django.contrib.admin',
    # ...
]
3. urls.py — replace the admin import
- Replace
from django.contrib import adminwithfrom pinmok.core import admin - Add the alias resolver at the bottom — skip this if you don't need URL aliases
from django.urls import path
from pinmok.core import admin  # replace with Pinmok's admin
from pinmok.padmin.views import alias_resolver

urlpatterns = [
    path('admin/', admin.site.urls),
    # other routes
]

# only needed for URL alias support
urlpatterns += [
    path('<path:alias>', alias_resolver, name='alias_resolver'),
]
4. Migrate, create a superuser account, and start
python manage.py migrate          # run migrations
python manage.py createsuperuser  # create a superuser account
python manage.py runserver        # start the server
Visit http://127.0.0.1:8000/admin/ and log in with the account you just created to see the Pinmok admin.
Requirements
Before you begin, make sure your environment meets the following requirements:
- Python >= 3.12
- Django >= 5.2
Pinmok's core dependencies are installed automatically by pip — no manual action needed:
- pillow >= 10.0
- filetype >= 1.0.10
Pinmok includes a utility for deduplicating translation files. It removes
msgidentries from.pofiles that already exist in the system's default translations, reducing file size. If your project uses multiple languages and you need this deduplication feature, you'll also need to installpolib:pip install polib
Installation
Via pip (recommended)
Make sure your Django project's virtual environment is activated, then run:
pip install pinmok
From source
If you want to browse the source code or contribute to Pinmok itself, clone the repository:
# GitHub
git clone https://github.com/pinmok/pinmok.git

# Gitee
git clone https://gitee.com/pinmok/pinmok.git
Enter the directory and install into your current environment:
cd pinmok
pip install .
If you need to modify Pinmok's code and have changes take effect immediately, install in editable mode:
pip install -e .
Embedding source directly into your project
Sometimes you need deep customization of Pinmok, or managing it through pip isn't practical. In that case, you can place the source directly inside your project directory.
One important thing to keep in mind: pinmok is a namespace package — its directory intentionally has no __init__.py. This is
by design, not an oversight. All of Pinmok's functional modules (padmin, content, etc.) live under this namespace, and it's precisely
this mechanism that allows them to be installed independently and combined as needed. Adding an __init__.py to the pinmok/ directory
will break the namespace package mechanism and prevent the modules from loading correctly.
The directory structure should look like this:
myproject/
├── manage.py
├── myproject/          ← your project config directory
├── your_app/           ← your application directory
└── pinmok/             ← namespace directory, no __init__.py
    ├── core/
    ├── padmin/
    └── content/        ← other Pinmok modules go here too
Configuration
settings.py
Registering the app
Add pinmok.padmin to INSTALLED_APPS. It must come before django.contrib.admin:
INSTALLED_APPS = [
    'pinmok.padmin',  # must come before django.contrib.admin
    'django.contrib.admin',
    'django.contrib.auth',
    'django.contrib.contenttypes',
    'django.contrib.sessions',
    'django.contrib.messages',
    'django.contrib.staticfiles',
]
Order matters here. Pinmok needs to complete its own registration before django.contrib.admin initializes. Placing it at the top of the
list is the safest approach.
Internationalization (optional)
If your project needs multi-language support, Pinmok follows Django's native conventions exactly. Set LANGUAGE_CODE and LANGUAGES as
usual, and add LocaleMiddleware to MIDDLEWARE. Pinmok introduces no additional i18n configuration of its own — refer to the Django
documentation for details.
urls.py
Open your project's urls.py and make the following changes:
Replace the admin import.
# change this
from django.contrib import admin

# to this
from pinmok.core import admin
Pinmok provides a drop-in module at pinmok/core/admin.py that mirrors Django's native import interface, so nothing else in your file needs
to change after this one-line swap.
The admin.site here is Pinmok's extended site instance, which inherits from and replaces Django's built-in AdminSite. Pinmok's menu,
permission, and page registration mechanisms all depend on it — if you keep the original from django.contrib import admin, none of these
features will work.
Add the alias resolver
If you need URL alias support, add the following at the bottom of the file:
from pinmok.padmin.views import alias_resolver

# place at the end of urlpatterns
urlpatterns += [
    path('<path:alias>', alias_resolver, name='alias_resolver'),
]
alias_resolver handles URL aliases — it lets you assign a friendlier path to any admin page and takes care of the redirect. It uses the
<path:alias> wildcard pattern, which will catch all requests not matched by earlier routes, so it must be last. If placed earlier, it will
intercept requests meant for other routes.
If your project doesn't use URL aliases, this can be omitted entirely.
A complete urls.py looks like this:
from django.urls import path
from pinmok.core import admin
from pinmok.padmin.views import alias_resolver

urlpatterns = [
    path('admin/', admin.site.urls),
    # other routes
]

urlpatterns += [
    path('<path:alias>', alias_resolver, name='alias_resolver'),
]
Migration and Initialization
Once configuration is complete, run the database migrations:
python manage.py migrate
Pinmok will create the tables it needs during migration, including those for menus, permissions, and site configuration.
Then create a superuser account:
python manage.py createsuperuser
Follow the prompts to set a username and password. This account is used to log in to the admin.
Starting Up
python manage.py runserver
Visit http://127.0.0.1:8000/admin/ in your browser and log in with the account you just created.
Synchronize Menus
If everything is set up correctly, you will see the Pinmok admin interface — the navigation menu on the left, and the content area on the right. The menu items may be incomplete at this point, so you'll need to perform an initial sync.
Click the Synchronize Menus button (☰) at the top of the left sidebar. Pinmok will automatically scan the menus.py file in each installed app, write the menu items to the database, and refresh the cache. Once the sync is complete, the full menu structure will appear immediately.
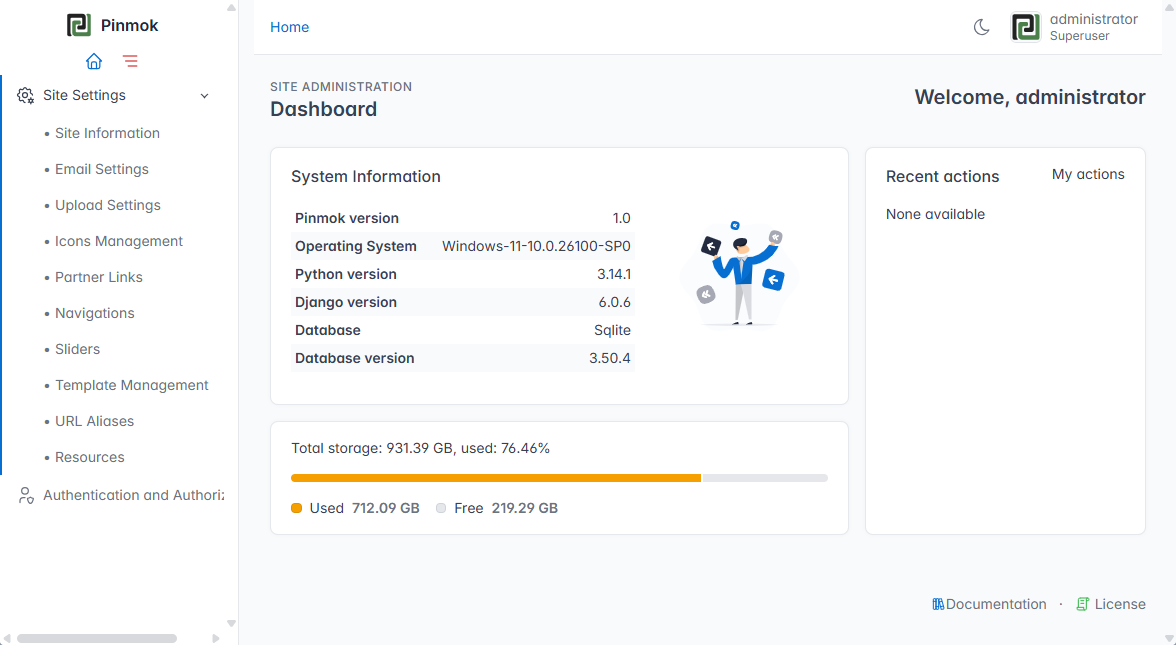
Installation complete — you're ready to start working!