Theme
If you're already familiar with the theme system, expand Quick Start below for a fast reference.
Quick Start
-
Create a theme directory
Inside any template directory Django can discover, create a new theme folder following this layout:
templates/ → Django template directory └── themes/ → fixed name, required └── mytheme/ → your theme directory ├── theme.json → theme descriptor file ├── index.html → a theme template └── index.json → template config file -
Write the theme descriptor: theme.json
Every theme directory must contain a
theme.jsonfile describing the theme's metadata and global variables. Variables defined here are available to every template in the theme.{ "name": "My Theme", "app_label": "myapp", "version": "1.0.0", "vars": { "site_title": { "title": "Site Title", "type": "text", "default": "My Site" } } } -
Write a template config file
The config file name must match the template file name exactly, aside from the extension.
actionmust match the URLnameof the view that renders this template.{ "name": "Homepage", "action": "myapp_index", "vars": { "banner_text": { "title": "Banner Text", "type": "text", "default": "Welcome" } }, "fieldsets": { "sidebar": { "title": "Sidebar", "vars": { "title": { "title": "Sidebar Title", "type": "text", "default": "Latest Posts" }, "count": { "title": "Item Count", "type": "number", "default": 5 } } } } } -
Write the template file
Variables declared in the config file are available directly in the template:
<title>{{ site_title }}</title> <h1>{{ banner_text }}</h1> <aside> <h2>{{ sidebar.title }}</h2> <p>Showing {{ sidebar.count }} items</p> </aside> -
Register a custom data source (optional)
To use a custom data source, create a
datasource.pyin your app's root directory and register a subclass of Django'sWidget. Pinmok instantiates and renders it directly on the admin configuration page, so the registered class must be a valid, instantiableWidgetsubclass.# myapp/datasource.py from django.forms.widgets import Select from pinmok.padmin.datasource import datasource @datasource.register('my_source') class MyDataSource(Select): def __init__(self, attrs=None): choices = [('', 'Select...'), ('a', 'Option A'), ('b', 'Option B')] super().__init__(attrs=attrs, choices=choices) -
Install and activate the theme in the admin
Go to the theme management page in the admin, locate
mytheme, and click Install followed by Activate. The theme takes effect immediately, and its variables become editable from the configuration page.
Overview
Pinmok provides a theme management system that lets developers build configurable front-end interfaces for individual apps. A theme is a set of Django templates paired with structured JSON configuration files. Variables declared in those files are managed visually from the admin, and Pinmok injects their current values into the template context at render time — no view code changes required.
The configuration system exists to solve a specific problem: some values can't be known at development time and only make sense once the site is actually deployed and in use — which category a sidebar should pull articles from, or which group of links a navigation menu should bind to, for example. Configuration files move that decision out of the codebase entirely, letting the site operator set it from the admin without touching the template. Config files are optional; a template that doesn't need admin-configurable values simply doesn't ship one.
Themes are managed per-app basis. Each app can have multiple themes installed, but only one can be active at a time. Config files support localization, and Pinmok automatically picks the file matching the currently active language.
Theme Structure
Theme directories must live inside a template search path Django can resolve, following a fixed layout convention:
templates/
└── themes/
    ├── default/
    │   ├── theme.json
    │   ├── index.html
    │   └── index.json
    └── nature/
        ├── theme.json
        └── ...
themes/ is a fixed directory name. Each subdirectory underneath it is an independent theme, and the subdirectory name is the theme's
identifier. Every theme must include a theme.json descriptor; which other templates and config files it ships is entirely up to the
developer.
Once a theme directory is in place, open the theme management page in the admin. (If you already have it open, refresh the page.) Pinmok automatically scans the themes/ directory and lists every theme it recognizes, ready to be installed and activated from there.
Managing Themes
Install and Activate
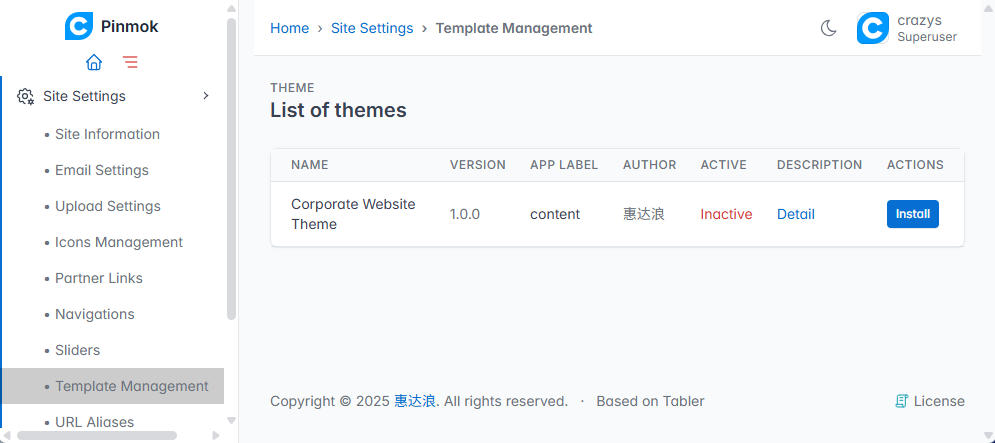
Once a theme is recognized, clicking Install on the theme management page makes Pinmok read theme.json and every template config file, writing the theme's metadata and initial variable values into the database. Once installed, click Activate to make it the live theme.
Only one theme per app can be active at a time. Activating a new theme automatically deactivates whichever theme was previously active for that app — no manual cleanup needed.
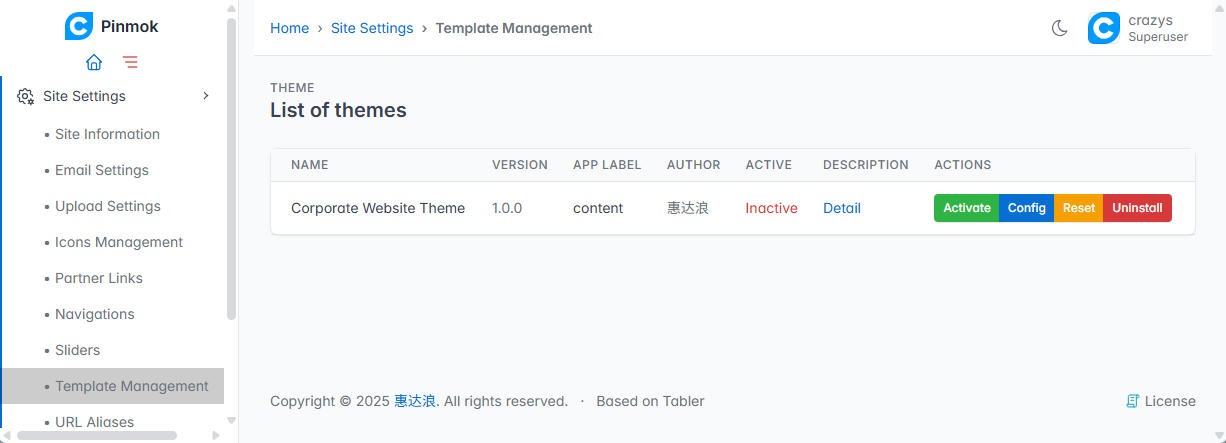
Uninstalling a theme only removes its database records; the files on disk are untouched. An active theme can't be uninstalled — activate a different theme first.
Resetting a Theme
Resetting wipes all configured variable values
Resetting deletes all of the theme's database records and reloads the initial values straight from the JSON files. Any variable values changed from the admin configuration page are lost permanently.
Configuring a theme's variables can take significant effort, so only reset once you're certain the current configuration is no longer needed. Updating template files alone doesn't require a reset — a reset is only necessary when the structure of a JSON config file itself changes (variables added or removed), to bring the database back in sync.
Configuration Files
Pinmok has two kinds of configuration files: the theme descriptor theme.json, and template config files. Both support defining variables (
vars) and grouped variables (fieldsets); the key difference is scope — variables in theme.json are available throughout the entire
theme, while variables in a template config file only apply to that specific template.
Template config files are optional. A template without one can still be rendered directly by a view, but it won't receive injected variables
and won't appear on the admin configuration page. The action field is what binds a config file to a specific page at runtime — Pinmok uses
it to locate the matching template config and merge in its variables. Multiple template config files can share the same action, enabling a
single page to offer several alternative templates — for example, serving a different layout depending on content state.
Localization
Config files can provide different content per language, following the naming pattern filename.langcode.json. For the theme descriptor:
theme.json: the default file, required. Pinmok falls back to this whenever no file matches the active language.theme.zh-hans.json: used when the admin's language is set to Simplified Chinese.theme.en.json: used when the admin's language is set to English.
Template config files follow the same rule — index.json, index.zh-hans.json, index.en.json, and so on.
Tip
Language codes must match Django's own language codes (e.g. zh-hans, en-us), since Pinmok looks up the config file using
the currently active language code.
theme.json
theme.json is the theme descriptor, required for every theme. Supported fields:
| Field | Required | Description |
|---|---|---|
name |
Yes | Theme name, shown in the admin to identify the theme |
app_label |
Yes | The app this theme belongs to; must be a valid, installed app label |
version |
Theme version | |
author |
Author information | |
description |
Theme description | |
preview_url |
A URL where the theme can be previewed | |
vars |
Global variable definitions, see Variables and Fieldsets | |
fieldsets |
Global grouped variable definitions, see Variables and Fieldsets |
Template Config Files
A template config file's name must match its corresponding template file, differing only in extension — a template named list.html
must have its config file named list.json. When installing a theme, Pinmok takes the config file's name (minus the extension) as the
template identifier, and uses it at runtime to locate the matching HTML file at themes/{theme directory}/{identifier}.html.
Naming must match
The template file (.html) and its config file (.json) must share the same file name, excluding extension — otherwise
Pinmok has no way to associate the two.
Supported fields in a template config file:
| Field | Required | Description |
|---|---|---|
name |
✓ | Template name, e.g. "Article List" or "Homepage", shown in the admin configuration UI |
action |
✓ | A page action identifier, matching the URL name of the view that renders this template; Pinmok uses it to bind the config to a specific page |
order |
Sort weight; an integer, lower sorts earlier; defaults to 10000 |
|
vars |
Variable definitions for this template, see Variables and Fieldsets | |
fieldsets |
Grouped variable definitions for this template, see Variables and Fieldsets |
order controls the display order of templates on the admin theme configuration page — lower values appear first. If omitted, templates are listed in whatever order they were written to the database during installation, which is essentially the order they were scanned in and isn't generally meaningful. When a theme has more than one template, it's worth setting order explicitly.
Variables and Fieldsets
Variables defined in a config file are injected into the template context once the theme is active, ready to use directly in the template.
Variables (vars)
{
  "vars": {
    "company_name": {
      "title": "Company Name",
      "type": "text",
      "default": "Pinmok",
      "tip": "Displayed in the page header"
    }
  }
}
Each key under vars is a variable name, accessible in templates as {{ company_name }}. Field reference:
| Field | Required | Description |
|---|---|---|
title |
✓ | The label shown for this variable on the admin configuration page |
type |
✓ | The variable's type; see the table below for valid values |
default |
Default value. text and textarea default to an empty string, number to 0, boolean to false |
|
tip |
Help text shown below the field on the admin configuration page |
| Type | Admin widget | Notes |
|---|---|---|
text |
Single-line text input | |
textarea |
Multi-line text input | |
number |
Number input | |
boolean |
Toggle switch | |
datasource |
Data source picker | Requires a source field; see Data Sources |
Fieldsets
Variables can also be grouped under fieldsets. Each group needs a title, shown as a section heading on the admin configuration page. The
vars inside a fieldset follow the exact same rules as top-level variables, but are accessed in templates as nested attributes, e.g.
{{ sidebar.count }}.
{
  "fieldsets": {
    "sidebar": {
      "title": "Sidebar",
      "vars": {
        "count": {
          "title": "Item Count",
          "type": "number",
          "default": 5
        }
      }
    }
  }
}
Data Sources
The variable types covered so far (text, number, boolean, and the rest) all have a simple way of getting their value: the user types a
string, a number, or flips a switch on the admin configuration page, using a fixed rendering Pinmok already provides. Some variables,
though, can't get their value that way — the value has to come from business logic instead. Which article category a sidebar
should pull from has to be looked up from the Category table; other cases might depend on logic that has nothing to do with the database
at all. A plain input field can't represent that — something has to run a query or some computation first, and only then can the user pick
from the result.
That's exactly what the datasource variable type exists for. It doesn't represent a fixed way of capturing input; it represents a source
the data comes from. Pinmok ships with a few commonly needed data sources that can be used directly from a config file via the source
field. When those don't cover what you need, you can register your own — see Custom Data Sources.
Using a built-in data source
Pinmok ships with the following built-in data sources:
| Key | Description |
|---|---|
nav |
Navigation groups |
slider |
Slider/carousel groups |
To use one, set the variable's type to datasource and point source at the data source's key:
{
  "vars": {
    "main_nav": {
      "title": "Main Navigation",
      "type": "datasource",
      "source": "nav",
      "multiple": false
    }
  }
}
| Field | Required | Description |
|---|---|---|
source |
✓ | The data source's key |
multiple |
Whether multiple selection is allowed; defaults to false |
Full Example
A complete example showing the directory layout, config files, and template for a working theme.
Directory layout
templates/
└── themes/
    └── sample/
        ├── theme.json
        ├── list.html
        └── list.json
theme.json
{
  "name": "Sample Theme",
  "app_label": "content",
  "version": "1.0.0",
  "author": "Jane Doe",
  "description": "A theme for demonstration.",
  "preview_url": "https://example.com",
  "vars": {
    "company_name": {
      "title": "Company Name",
      "type": "text",
      "default": "",
      "tip": "Displayed in the site header and browser title"
    }
  },
  "fieldsets": {
    "sidebar": {
      "title": "Sidebar",
      "vars": {
        "category": {
          "title": "Category",
          "type": "datasource",
          "source": "category"
        },
        "title": {
          "title": "Sidebar Title",
          "type": "text",
          "default": "Latest"
        },
        "count": {
          "title": "Item Count",
          "type": "number",
          "default": 5
        },
        "show_thumbnail": {
          "title": "Show Thumbnail",
          "type": "boolean",
          "default": true
        }
      }
    }
  }
}
list.json
{
  "name": "Article List",
  "action": "content_article_list",
  "vars": {
    "page_title": {
      "title": "Page Title",
      "type": "text",
      "default": "Articles",
      "tip": "Displayed at the top of the list page"
    },
    "page_size": {
      "title": "Page Size",
      "type": "number",
      "default": 10
    },
    "show_author": {
      "title": "Show Author",
      "type": "boolean",
      "default": true
    }
  }
}
list.html
<h1>{{ page_title }}</h1>

<p>Page size: {{ page_size }}</p>

{% if show_author %}
<p>Author information is displayed.</p>
{% endif %}

<aside>
    <h2>{{ sidebar.title }}</h2>
    {% if sidebar.show_thumbnail %}
    {# render thumbnails #}
    {% endif %}
</aside>

<footer>{{ company_name }}</footer>
Backend Development
This section is for developers writing views, models, or other Python code. Template authors don't need any of this.
Custom Data Sources
When the built-in data sources (nav, slider) don't cover your use case — for example, when a variable needs to pull from a model in your
own app, or its value depends on business logic — you write a custom one. The process has two steps: write a class that subclasses
Django's Widget (or any of its subclasses), implement the data-fetching logic inside it, then register that class with Pinmok's
data source registry using the @datasource.register decorator, after which it can be referenced from a config file via source.
The admin theme configuration page calls the registered class directly to produce a Widget instance and renders it, so whatever you
register has to be a valid, instantiable Widget subclass.
Discovery Convention
Pinmok automatically scans every installed app's datasource.py on startup. Because of that, custom data sources must be defined in
a datasource.py file at the root of an app's package (e.g. myapp/datasource.py) in order to be picked up.
Example
Here's a complete example. Suppose there's a MyModel model and the admin configuration page needs a select box letting the user pick one
of its existing rows:
# myapp/datasource.py

from django.forms.widgets import Select
from pinmok.padmin.datasource import datasource


@datasource.register('my_source')
class MyDataSource(Select):
    def __init__(self, attrs=None, multiple=False, category=None):
        from .models import MyModel
        queryset = MyModel.objects.filter(category=category) if category else MyModel.objects.all()
        choices = [('', 'Select...')] + [(obj.pk, obj.name) for obj in queryset]
        super().__init__(attrs=attrs, choices=choices)
A few things are happening here:
@datasource.register('my_source')registers the class under the keymy_source, the name a config file will use to reference it.MyDataSourcesubclasses Django's built-inSelect, so it's already a valid select-boxWidget— there's no rendering logic left to implement.__init__is where the actual query runs: it filtersMyModelby the incomingcategoryargument and builds achoiceslist of(value, label)pairs. This is the part that actually makes it a "data source" rather than a static control.multipleandcategoryaren't standard DjangoWidgetarguments — they're custom to this data source, and their values come straight from the config file, following the parameter-passing rule described below.
Once registered, it can be referenced from a config file with "source": "my_source":
{
  "vars": {
    "my_var": {
      "title": "My Variable",
      "type": "datasource",
      "source": "my_source",
      "multiple": false,
      "category": "news"
    }
  }
}
Keep the visual style consistent
The admin configuration page uses Tabler styling throughout. A custom widget that subclasses Django's built-in classes directly may end up looking inconsistent with the rest of the admin. Where possible, prefer subclassing one of Pinmok's own widgets (see Form Widgets in the previous chapter for the full list); failing that, you can also hand-write HTML that follows Tabler conventions.
Parameter Passing Rules
Every field in the config file other than title, type, default, and tip is passed as a keyword argument into the Widget's
__init__. In the example above, multiple and category work this way: the config file's "multiple": false is automatically passed
through as multiple=False.
- If
__init__declares**kwargs, every extra field is passed through as-is. - If it doesn't, only the parameters explicitly declared in
__init__are passed; anything else is ignored.
Using the Theme Service in Views
Resolving a template's path and injecting its variables doesn't happen automatically — a view has to call into ThemeService explicitly.
Pinmok exposes three methods for this: get_template_path, get_vars_context, and get_template_choices.
get_template_path
Resolve a template path
ThemeService.get_template_path(app_label: str, filename: str) -> str | None
Returns the full path to a template within the active theme, ready to pass straight into render(). This method only builds a path string —
it doesn't read any files or perform validation.
Parameters
app_label: the app label. Pinmok uses it to look up that app's currently active theme; themes are independent per app.filename: the template's file name, without extension. It should match an actual template file in the theme, and the name of that template's config file if one exists.
Returns
If the app has an active theme, returns a string of the form themes/{theme directory}/{filename}.html. If the app has no active theme,
returns None. Callers are expected to handle the None case themselves, typically by falling back to the app's own default template.
Example
from pinmok.padmin.service.theme import ThemeService


def article_list(request):
    # Resolve the path to the "list" template in content's active theme
    template_path = ThemeService.get_template_path('content', 'list')

    if template_path is None:
        # No active theme — fall back to the app's bundled default template
        template_path = 'content/list.html'

    return render(request, template_path, {})
get_vars_context
Get a template's variable context
ThemeService.get_vars_context(app_label: str, filename: str) -> dict
Returns every configured variable value for a given template (identified by filename) under the active theme, ready to inject into the
render context. There's no need to read the JSON config files yourself or merge global and page-level variables — this one call does it.
Parameters
app_label: the app label. Pinmok uses it to look up that app's currently active theme.filename: the template's file name, without extension — the same meaning as thefilenamepassed toget_template_path, used to locate one specific template config unambiguously. Becausefilenameis unique within a theme, this lookup stays correct even when several templates share the sameaction.
Returns
A dict merging the global variables from theme.json with the page-level variables from that filename's template config; on a key
collision, the page-level variable takes precedence. Top-level variables appear as plain key-value pairs, accessible in templates as
{{ variable_name }}; fieldset variables appear as nested dicts, accessible as {{ group_name.variable_name }}. If the app has no active
theme, an empty dict {} is returned — no exception is raised, so the return value is always safe to use directly.
Example
from pinmok.padmin.service.theme import ThemeService


def article_list(request):
    # Get every variable value configured for the "list" template
    # The dict contains both top-level variables (e.g. company_name) and fieldsets (e.g. sidebar)
    context = ThemeService.get_vars_context('content', 'list')

    # Add business data alongside the theme variables — they don't collide
    context['articles'] = Article.objects.all()

    # In the template, this is accessible as context['sidebar']['title'], i.e. {{ sidebar.title }}
    template_path = ThemeService.get_template_path('content', 'list')
    return render(request, template_path or 'content/list.html', context)
get_template_choices
List a page's alternate templates
ThemeService.get_template_choices(app_label: str, action: str) -> list[tuple[str, str]]
Returns the list of available template filenames for a given action. This is the method that powers "this page can be rendered with more
than one template" scenarios.
Parameters
app_label: the app label. Pinmok uses it to look up that app's currently active theme.action: the page action identifier, matching theactionfield in a template config file.
Returns
A list of (filename, label) tuples, ready to use directly as choices in a select field. The first entry is always (action, 'Default'),
representing the default template that shares its name with action; the rest come from any other template configs sharing that same
action but with a different filename, with the label taken from each one's name field.
from pinmok.padmin.service.theme import ThemeService


def template_settings(request):
    # Get every template available for the "shop_product_detail" action
    choices = ThemeService.get_template_choices('shop', 'shop_product_detail')
    # e.g.: [('shop_product_detail', 'Default'), ('product_promo', 'Promotional Product Detail')]

    return render(request, 'shop/admin/template_settings.html', {'choices': choices})
Summary
get_template_path resolves a template file, get_vars_context retrieves that template's variables, and get_template_choices lists which
templates are available for a given action. Each is independent — how they're combined in business code is entirely up to the developer.